//Google Analytics

Wednesday, October 31, 2012

Cook: Homemade Ketchup!

One of my favorite Pinterest finds is Skinny Taste's simple and delicious recipe for homemade ketchup!  For a few years now, I've been trying my best to avoid high fructose corn syrup because it's so bad for us! HFCS is cheap and plentiful and is generally laden with GMOs (genetically modified organisms). If I'm going to have sugar, I want it to be as natural and healthy as possible. No HFCS, no Splenda, no crap like that. I want organic raw sugar! I'm convinced it's one of the best sweetener choices out there. There are other options like stevia but I generally stick with raw sugar. 


Ready to make some delicious, healthy ketchup for your family? Well let's get to it. 


I love that most of the ingredients you probably already have in your pantry and spice cabinet! Today I actually doubled the recipe so I've listed the ingredients for a single batch and a double batch. The original recipe makes about 12oz and the doubled recipe makes about 24oz. I've been saving jars so that's what I'll be storing mine in! Or you could reuse a regular ketchup bottle and if you have a picky family, they will never even know that it's "healthy!" My husband LOVES this ketchup and so do I!


Ingredients:
  • 6 oz can tomato paste
  • 1/2 cup white vinegar
  • 1/4 cup water
  • 1 tsp sugar
  • 3/4 tsp salt
  • 1/4 tsp onion powder
  • 1/8 tsp garlic powder
  • 1/4 cup honey (or agave)

Ingredients for double the recipe:

  • 12 oz can tomato paste (or 2 6oz cans)
  • 1 cup white vinegar
  • 1/2 cup water
  • 2 tsp sugar (3 if you want it a little sweeter)
  • 1 1/2 tsp salt
  • 1/2 tsp onion powder
  • 1/4 tsp garlic powder
  • 1/2 cup honey (or agave)


Directions: 

1. Mix all of the ingredients into a medium saucepan and whisk them together.

2. Bring the ketchup to a boil but then simmer it for about 15-20 minutes.


3. Be sure to whisk it often so it doesn't burn to the bottom of the pan! 


4. Let it cool then store it in an air-tight container in the fridge. 

And that's it! So easy! 


Helpful hints: 

I actually ended up adding another 1/4 cup of water because a lot of it seemed to boil off while it was cooking. But that all depends on how thick you want your ketchup! 

I also waited till it was just about cooled off before adding in the honey. I read that it is better to not cook the honey because it will kill the good proteins in it. I also have agave but just chose to use honey this time. Both should work wonderfully! 

Taste test it along the way so you can customize your ketchup. If you like more vinegar, add more vinegar! If you prefer sweeter ketchup, add a dash more sugar or honey!

Try to make it as healthy as possible by getting Kosher salt and organic sugar or raw sugar. I personally like to buy Sugar In The Raw as well as Agave In The Raw. Healthy and delicious! I believe you can get both at either Target or your regular grocery store. I shop Food Lion usually because that's what we have here in the Burg. 


There you have it...delicious, quick, easy, healthy homemade ketchup! 


This is a regular spaghetti sauce jar with measurements on the side till 16oz. I estimate it can hold a total of up to 22oz. I filled this jar and had a several big spoonfuls leftover. 


Tonight the first sampling was on top of an Amy's veggie burger and homemade honey wheat bread as the bun! Paired with a salad it was a delicious and veggie-full dinner!

Have you made your own condiments before? What is your favorite one to make? 

Till next time,

I've linked up to Fluster's Creative Muster #42 with Fluster Buster and Just Dip It In Chocolate!


Tuesday, October 30, 2012

Crochet: Crochet Your Cords!

Cords and cables are ugly...crochet them!


I briefly saw this idea on Pinterest ages ago but dismissed the idea because I had no idea how to crochet. In the past few months I've learned and really enjoy it! I stumbled upon the idea again and decided to try it! I'll give you a quick tutorial but if you know how to crochet, it's pretty easy! The most difficult part was getting used to handling the yarn and the cord at the same time. 

To be honest, Pinterest has a crappy search feature. I couldn't find this idea on there so I just used good old-fashioned Google! I found Moogly's Blog and she had the instructions for crocheting earbud cords.  My first attempt was on my iPhone cord instead of my earbuds. I'll do those next! 

(I apologize ahead of time for the awful, mismatched lighting in the pictures. Bad lighting led to me switching between my phone and my crummy camera to try and get good shots! One of these days I'll get something better, scout's honor.)


To start, all you need is your cord or earbuds, some thin yarn (the thinner, the better because thick yarn can easily make it too bulky), and a small crochet hook. Mine says US F5/3.75MM. I'm not totally sure what that means, it was just the smallest hook I had! I'm using Sugar 'n Cream's tangerine cotton yarn. As you can tell, it's much prettier in my pictures than the link's picture. It's a cute color and it's soft but strong. I really like their yarn. 


Start off with your standard slip knot but slip your cord through before tightening the knot. If you're new to crochet, definitely check out YouTube for great tutorials on how to do a slip knot. Check out this video I found for you. It's different than how I do it but it's just as good!


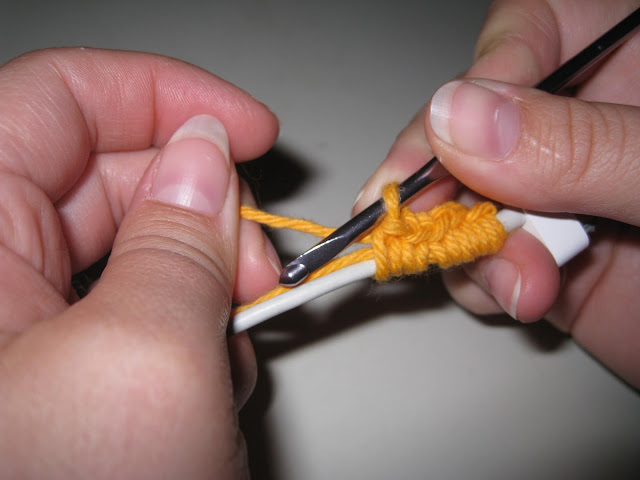
(Don't mind my stubby fingers!) Next, simply single crochet (sc) around the cord. Be sure to hold the loose yarn/tail end along the cord so that it is crocheted tightly to the cord. This saves you from having to tie and cut it. The following is step-by-step how to crochet around the cord.


Hold your working yarn out with your thumb and forefinger and the tail end being held by your other fingers. 


Reach underneath the cord and pull the working yarn forward and up.


You'll have two loops on your hook. Now grab your working yarn again. 


And pull it through both loops. Now keep going until you reach the end! Easy!


This is how it looks up close. Although I really like it, I wasn't totally satisfied so on the next cord (my husband's) I did a double crochet (dc) instead. I think the dc (green) is more visually interesting, but I like them both! 


So who wouldn't want to make this...


...look like this?


I tried to twist the yarn to make it look more interesting...but...it didn't. So I untwisted it again. 


There you have it....a cute phone cord! Easy peasy right? Give it a try and share your pictures! I've never given a crochet tutorial before so if you have any questions, let me know and I'll do my best to answer them! 

Till next time,
Catherine


Monday, October 29, 2012

Hurricane's a-comin'!

The entire East coast has been preparing for Hurricane Sandy this past week, except me. Lynchburg is too far inland to be getting much more than a little wind and rain. So far, that's all we've seen. Sandy is supposed to hit land this evening but I believe she'll already be North of Virginia by then. I'm all about being prepared but I'm not one to freak and run to the store and buy all the bread! At least storms are good for business! Once we have more space, I plan to have a little stockpile of emergency supplies. Right now it's a flashlight, some candles, and cans of tuna. Haha.

Instead of rushing through the grocery store in a panic, I'm relaxing in my PJs all warm while tea brews and German chocolate cake bakes in the oven! Sorry, I cheated and used a box. But I didn't have any eggs so I used two bananas as a replacement. I can let you all know how that goes! So, no recipe today but possible an ingredient supplement! I could taste the banana ever so slightly when I, ahem, cleaned up the batter ;) but I don't think it will be noticeable when it's baked, especially with the icing. I hope I'm timing this cake right so that it's ready when my husband gets home from work! German chocolate is his favorite!

I need to get my behind in gear and re-organize our desk! We finally gave away our guest bed and so now our spare bedroom is going to be an office/craft room. We're both excited about finally being able to really use this room! As for when we have guests, we have an awesome air mattress that a friend gave us as a wedding gift! The room isn't much yet but it's a work in progress!

Once my husband gets home it's time for the best cold & rainy day things...warm blankets, cuddling, fuzzy socks, hot tea, hot chocolate, popcorn, movies, warm pets and a warm husband :) Tonight it will be The Walking Dead instead of movies!

What do you like to do on cold, rainy days? Do you like to go out and stock up before a storm, just in case? What's in your stockpile/emergency kit?

Till next time,
Catherine

Saturday, October 27, 2012

DIY: Building a Medieval Helmet Out of Cardboard


For this post, I technically have my first guest blogger! My husband, Brian! He’s recently been making props and helmets out of cardboard and hot glue and he’s been having a lot of fun in the process. I told him he needed to do a tutorial for the blog and he agreed! Without further ado…

Hey everyone, my name is Brian and I’m Catherine’s husband. Some friends and I have recently started a film company called Visionwood Productions. I’ve loved making movies since I could wield a camera and have fortunately found a great group of people who are as passionate about it as I am. One of our upcoming projects is a short medieval film and I’ve been working on props and helmets for us to wear. I’ve hard a crazy hard time finding good tutorials online on how to make them so I got a basic idea and just ran with it. My hope is that this blog tutorial will help other people to create awesome props with minimal expense!


You’ll need:
  • Lots of cardboard
  • Box cutter
  • Rotary board or a hard surface to cut on
  • Hot glue gun and lots of glue sticks
  • Flat black spray paint
  • Metallic spray paint (silver, bronze, gold, whichever you prefer)
  • Junk paint brush
  • Paper
  • Pencil
  • Ruler

Step 1: Gather all your materials and have space to work. Helpful hint: Play something awesome like a Coldplay station on Spotify!

Step 2: Cut four 1” wide strips, about a foot and a half in length, but the length doesn’t have to be precise, they just need to be long. Crush the frames so that they are easily bended.


Step 3: Wrap two strips around your head to figure out the size it will need to be. This will be the basic frame of the helmet. Be sure to add a couple inches for extra space. You’ll need this later on. You could also just use a measuring tape first, but this looks more fun! Hot glue the pieces together to create the size you need.


Step 4: Decide where you want the front to be and stick with that. Put one strip long ways around the circle to fit your head. Glue it down. Then put the other strip in the other direction, glue it down and glue the strips to each other where they meet.


Step 5: Fold the edges up and glue them down. Leave the front one alone, because that will be the nose guard piece later.


Step 6: Cut out a circle that’s about 3-4” in diameter. Glue it to the top of the inside of the helmet frame.


Step 7: Cut 4 pieces of cardboard in the shape in the following picture. It’s hard to describe, it’s like a rounded triangle. Use the measurements you see in the picture. The lines on the rotary board are 1”x1”. Crush them and make them pliable. Mush the pieces into the inside of the frame so they touch the frame on all sides and glue them into place. You can cut them in half if it’s too difficult to place them as is. It's not exact and pieces will overlap, but that's fine.


Step 8: Fold a piece of paper in half and cut out the pattern in this picture. This will be your template for the face area of the mask. Then cut out the pattern on cardboard. When you cut out the eye holes, save the pieces and use them for decoration later. Again, make the piece pliable. You have to do the next step before putting on the face mask so just set it aside for a minute. 


Step 9: Cut out two more pieces of cardboard in the shape of the nose piece and glue them over top to reinforce it. Put glue on the sides of the nose piece for extra reinforcement. 


Step 10: Put the face plate on the mask and hot glue it behind the nose piece.


Step 11: With my head size I then cut a piece of cardboard that is 23"x5" inches, this will vary with your head size but the 5 inch height is a good height. Make this piece pliable because this will be the neck guard of the helmet. Put the neck guard in place and then glue it to the face plate leaving the back and sides of it unglued. Put it on and see how it fits.


Step 12: Make five 3 ½" cardboard strips and glue them to the inside of the neck guard gluing them to the top of the helmet at the same time. This holds the two large pieces together.


Step 13: Fold a piece of paper in on itself till it’s about an inch across. Place on mask where shown.


Step 14: Attach the eye cutouts onto the outside of each eye hole.


Step 15: Cut seven ½” x 7” strips and glue them around the outside of the helmet, spaced evenly apart. This part is purely decoration.


Step 16: Cut a glue stick into little pieces and glue them around the helmet as decoration. You could also use brass fasteners but I found this to be easier because it was hard to make a hole through more than one layer of cardboard.


Step 17: Add cardboard and glue dots as you see fit to make it as decorated as you want.


Step 18: Paint the entire helmet with a flat black spray paint. Let it dry completely.  I used the interior/exterior fast dry spray paint from Wal-Mart. We generally try to avoid Wal-Mart but it’s less than $1 there, and making these helmets tends to use a lot.


Step 19: Spray a small amount onto your brush and vigorously brush onto the helmet. Do it in any direction, using more or less where you think it should be. Do this all over the helmet till you’ve achieved the look you want.


Step 20: Enjoy! 

Front

Right side, the left is the same.

Back


All four of the helmets that I have made in the past week.

Helpful Hints:
Contact your local grocery store or Target and ask if you can have the boxes that they throw out each week. It’s free and there’s plenty!

Feel free to alter/expand this design as you feel necessary. Get creative and have fun! These helmets have been a lot of fun to make and I’m excited about using them in the movie we're going to make!

**NOTE: This is an original project. Please do not sell the pattern or created project for profit. It is for personal use only. Thanks!**

Hope you enjoyed this tutorial and I’d love to see what you create! Send us pictures of the helmets you create at CatherinePageWood@gmail.com! Leave a comment if you have any questions! Have fun!

Stay creative,
Brian